Description
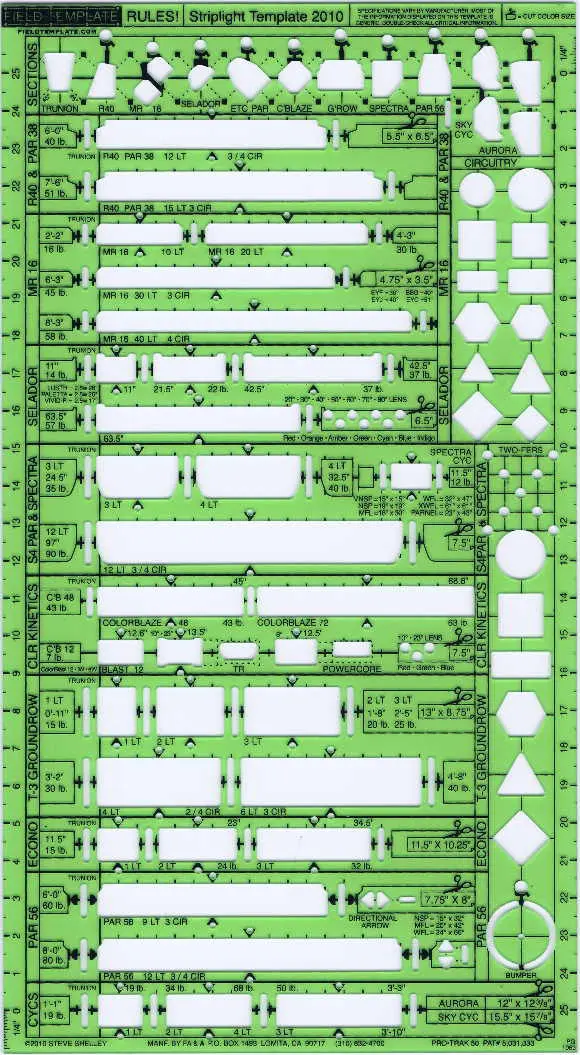
The 1/4″ Striplight is divided into all of the major striplight food groups; starting with LEDs like Selador, Color Kinetics, and Altman, and continuing with R40 and PAR 38s, MR-16s, T-3s, PAR 56s, Iris and Far Cycs. Printed data shows the actual size, weight, cut color, and circuitry combination for every single strip. They?re aligned on the patented Pro*Trak 50 system (Showing you the recommended distance between each striplight.) The printed portions of striplight on either side of each symbol are pre-measured distances on either side from the cutout hole. Drafting two striplights becomes simple: Trace one striplight, slide the template sideways, so that the traced symbol matches with a printed portion, and trace the same symbol again. The two striplights are now accurately pre-spaced apart in scale. Done is beautiful. Cue the choir. Wax the cat.
But wait. There’s more. Lots more. Oodles and oodles more:
Across the top are sectional cutouts of each type of striplight, showing the true vertical distance between each strip to the C-Clamp on the batten.
On the left side of each cutout symbol, the printed numbers list the length and weight of each striplight.
The small triangles above and below each cutout symbol indicate the center of that striplight. Each triangle has a little hole so you can mark the center point directly on the drafting.
The printing under each cutout symbol indicates the number of lamps and every circuitry possibility for that striplight.
On the right side of each group is a small folded back Post-it (with scissors) indicating the cut color size for that type of strip.
The vertical slits on either side of each cutout symbol can be used to trace trunions (indicating that strip as a groundrow unit).
Horizontal and vertical arrows are included in the PAR 56 group, indicating the axes of the lamps or the focus direction.
Two sizes of circuitry symbols are stacked on the right hand side, including horizontal rectangles and diamonds.
Under them is a handy set of small circles (to indicate twofering).
Below the third set of circuitry symbols is a scaled scenery bumper.
The 1/4? scale rulers that run along each side of the template are reversed one side to the other. (So you don’t have to flip the template like a pancake to measure distances left and right from centerline).


